Experiment Tracking and Model versioning in MLflow
Requirements
🔒 You need a platform account with full access level.
We currently have two instances of MLflow running:
When following this tutorial, adapt the MLflow links depending on which Project or Virtual Organization you belong to.
In case you already have a MLflow account, you can proceed to step 2.
1. Register for an account in MLflow
Go to the Sign Up page for self registration.
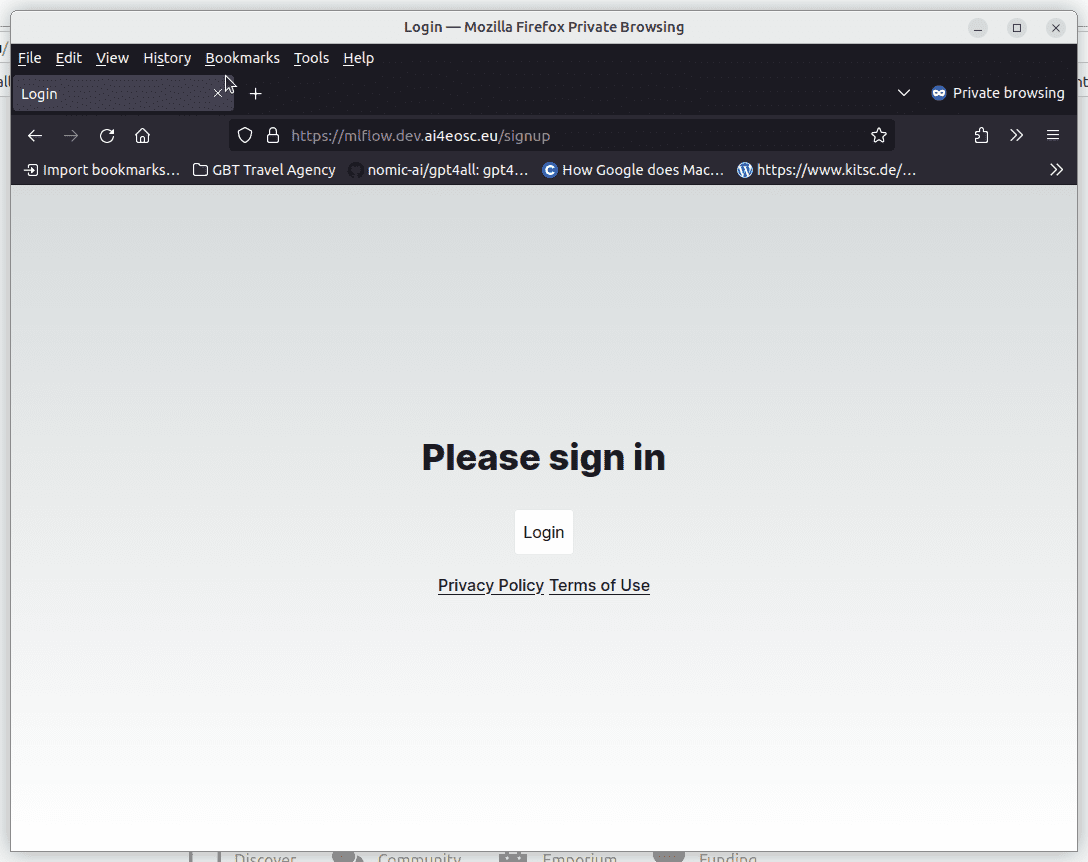
Then, in the next window:
insert your password.
read and accept the Privacy Policy and Terms of Use.
Finally you will be shown your user settings:
In case you want to change the password you can enter a new password in the text box
Passwordand then click theUpdatebutton.You can check your user info (your
usernameis your email!)You have also the option of deleting your account as well as logging out.
Once you are ready, proceed to the new step by clicking in Go to mlflow.
2. Login the MLflow UI
In the MLflow login page you will be asked to input your credentials:
Username: the email associated with your authentication account accountPassword: the password you choose in step 1.
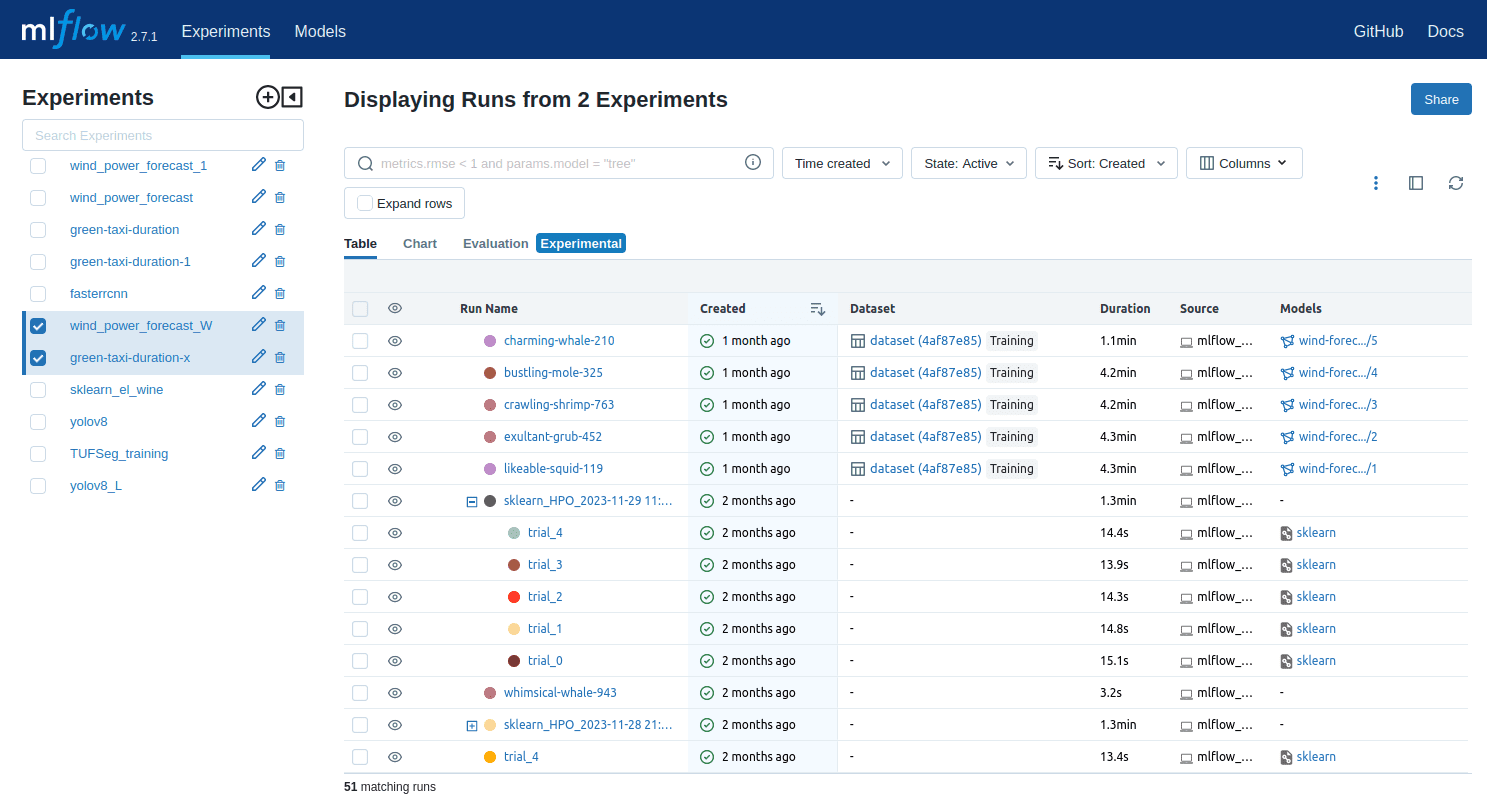
Once you login, you will see the default MLflow UI as follows:
3. Log your Experiments
Now you are ready to start logging in your experiments and saving the (best) trained model with a version in Model Registry.
For this you have to do the following steps in your deployment.
Install MLflow
First install mlflow client from the IDE that you are using to build your AI model, by executing:
pip install mlflow[extras]
You can also use mlflow-skinny for a minimal setup, therefore reducing potential dependency conflicts with your other module packages.
Define MLflow credentials
MLflow reads the credentials as envvars. When creating a deployment in the platform, those credentials are automatically injected in the environment by the platform (no need to create them!).
You can check these vars from your command line in your deployment:
echo $MLFLOW_TRACKING_USERNAME
echo $MLFLOW_TRACKING_PASSWORD
echo $MLFLOW_TRACKING_URI
If you find that your credentials are not correctly injected by the platform, try updating your password.
Modify your Python code
Here is an example on how to start tracking in your training loop:
import mlflow

mlflow.set_experiment(experiment_name='your_experiment_name')

# or Name of the experiment (e.g. name of the code repository)
MLFLOW_EXPERIMENT_NAME="your_experiment_name"

# Name of the model to train. HAS TO BE UNIQUE, Please, DEFINE ONE!
MLFLOW_MODEL_NAME="your_model_name"

#MLflow specific statements to log your experiment
#Insert the following statements in your code where you are training your model,e.g.
def train_model():
   # your existing code here

   history = model.fit(X_train, y_train, epochs=100, batch_size=64,
               validation_data=(X_val, y_val), callbacks=[early_stopping])

   with mlflow.start_run(run_name="run-demo") as run: # mlflow starting command

      # Log metrics to MLflow for each epoch
         batch_size = 10  # Log metrics every 10 epochs (adjust as needed)
         for epoch, (loss, val_loss) in enumerate(zip(history.history["loss"],
                                                history.history["val_loss"])):
         if epoch % batch_size == 0:
            mlflow.log_metric("train_loss", loss, step=epoch)
            mlflow.log_metric("val_loss", val_loss, step=epoch)

      # Log params
      mlflow.log_params({
         "hidden_units": 100,
         "activation": "relu",
         "epochs": 100,
         "batch_size": 64,
         "validation_split": 0.2
      })

      # Log model using: mlflow.<flavor>.log_model()
      # Log the TensorFlow using mlflow.tensorflow.log_model
      mlflow.tensorflow.log_model(model, artifact_path='artifacts')

      # Log additional artifacts
      # Log the CSV file as an artifact in MLflow
      mlflow.log_artifact(data_csv, artifact_path='artifacts/dataset')
We provide some examples of mlflow implementations to serve as reference, as well a specific integration of mlflow once you have created your api in the Marketplace.
For more information, see the Getting Started guide in the official MLflow docs. Additionally, you can go to AI4EOSC YouTube channel and check these videos on MLFlow: 1) How to create an account in MLFlow: 2) How to Log an experiment in MLFlow:
Finally, to save the models in the registry, you have to add the following code in your deployment:
# REGISTER MODEL to MODEL REGISTRY #
result = mlflow.register_model(
   f"runs:/{run_id}/artifacts/", MLFLOW_MODEL_NAME
)
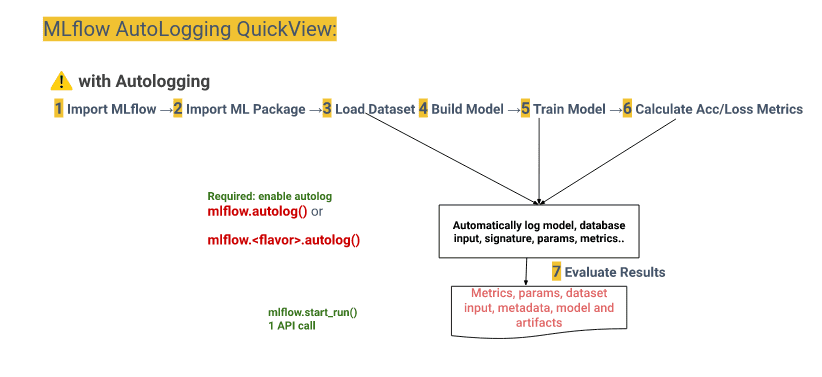
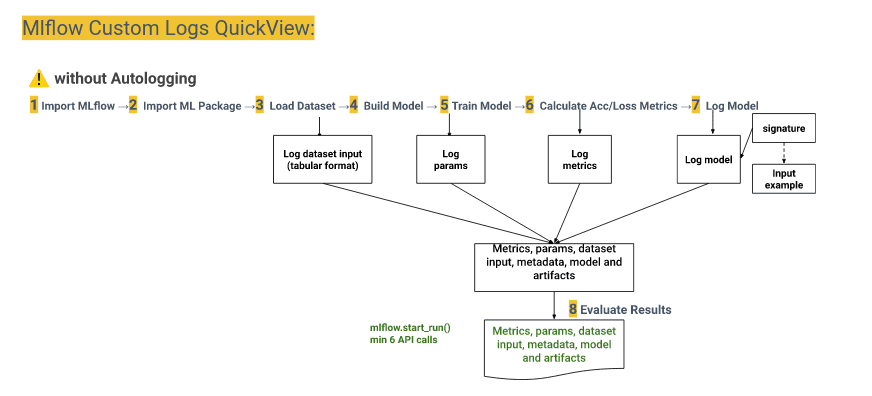
4. MLflow AutoLogging and CustomLogging
There exists two Logging options as illustrated in the following Figures.
Important commands to know
# Log Param (Log a parameter under the current run):
mlflow.log_param("batch_size", 64)
# Log Params (Log multiple parameter under the current run):
mlflow.log_params({"hidden_units": 100,
                            "activation": "relu",
                            "batch_size”:64,
                            "validation_split": 0.2})
# Log Metric  (Log a metric under the current run):
mlflow.log_metric("mse", 90.00)
# Log Metric  (Log multiple metrics under the current run):
mlflow.log_metrics({"mse": 90.00,
                              "rmse": 75.00})
Log Artifact(s)
# Log Figure (Log a figure as an artifact)
import matplotlib.pyplot as plt
fig, ax  = plt.subplots()
ax.plot ([1,2],[4,5])
mlflow.log_figure(fig, "fig_plot.png")
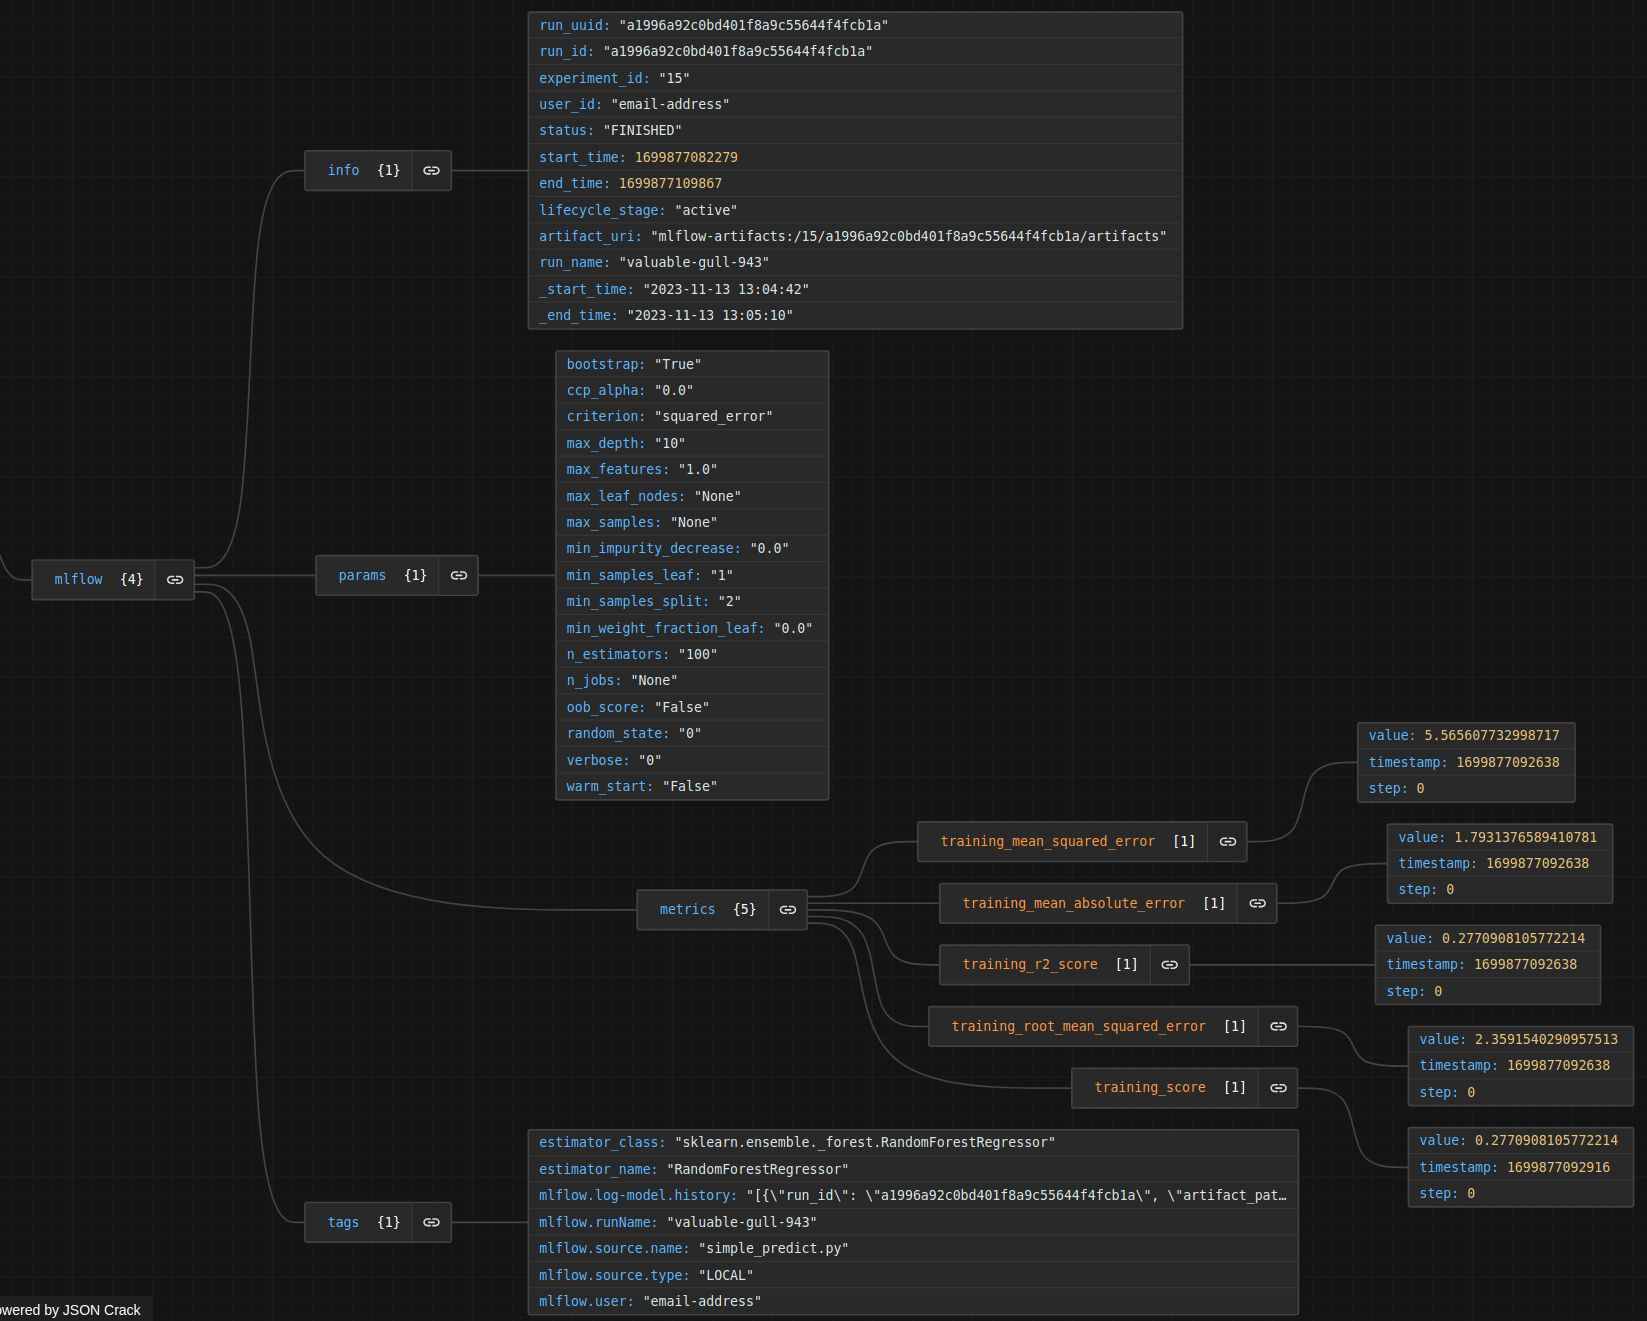
Relevant information extracted from an Experiment-Run (see figure below) defined as a single execution of a machine learning code
5. MLflow Model Versioning and Production Deployment
Adding Tags to Model Versions You can add tags to model versions to include additional metadata:
 from mlflow import MlflowClient

# Get the latest model version
client = MlflowClient()
latest_versions = client.get_latest_versions(MLFLOW_MODEL_NAME)
latest_version = latest_versions[0].version

# Add tags to a specific model version
client.set_model_version_tag(
    name=MLFLOW_MODEL_NAME,
    version=latest_version,
    key="deployment_status",
    value="active"
)

# Add multiple tags
tags = {
    "data_version": "v2.0",
    "algorithm": "random_forest",
    "responsible_team": "data_science",
    "accuracy": "0.92"
}

for key, value in tags.items():
    client.set_model_version_tag(
        name=MLFLOW_MODEL_NAME,
        version=latest_version,
        key=key,
        value=value
    )
Setting Model Version Aliases for Production MLflow now uses aliases instead of stages (which are deprecated). Aliases provide a more flexible way to manage model deployment status. Using Aliases (Champion/Challenger Model Pattern)
 from mlflow import MlflowClient

# Set the 'champion' alias for your production model
client = MlflowClient()
client.set_registered_model_alias(
    name=MLFLOW_MODEL_NAME,
    alias="champion",
    version=latest_version
)
Loading the Production (Champion) Model You can add tags to model versions to include additional metadata:
# Load the champion model for inference
champion_model = mlflow.pyfunc.load_model(
   model_uri=f"models:/{MLFLOW_MODEL_NAME}@champion"
)

# Make predictions
predictions = champion_model.predict(data)
Search model versions Search for a specific model name and list its version details using
search_model_versions()method and provide a filter string such asname='sk-learn-random-forest-reg-model'
from mlflow import MlflowClient

client = MlflowClient()
for mv in client.search_model_versions("name='sk-learn-random-forest-reg-model'"):
   pprint(dict(mv), indent=4)