Federated Learning with Flower
Requirements
🔒 You need a platform account with full access level.
In this tutorial, we will guide you on how to use the Federated Learning (FL) server in the platform to perform a FL training using Flower.
Deploying a Federated server
The workflow for deploying a FL server is similar to the one for deploying a module.
In this particular case, you will need to pay attention to:
The service deployed: When configuring the deployment of the FL server, we recommend selecting
JupyterLaborVS Codeas service to run if you want to monitor the process. If you selectfedserver, the FL server will be started automatically, but you will not be able to monitor the process (e.g. if there is a failure, how the clients are connected or if any of them is disconnected).The Docker tag: In the first configuration step you must select the docker tag. Note that the tag
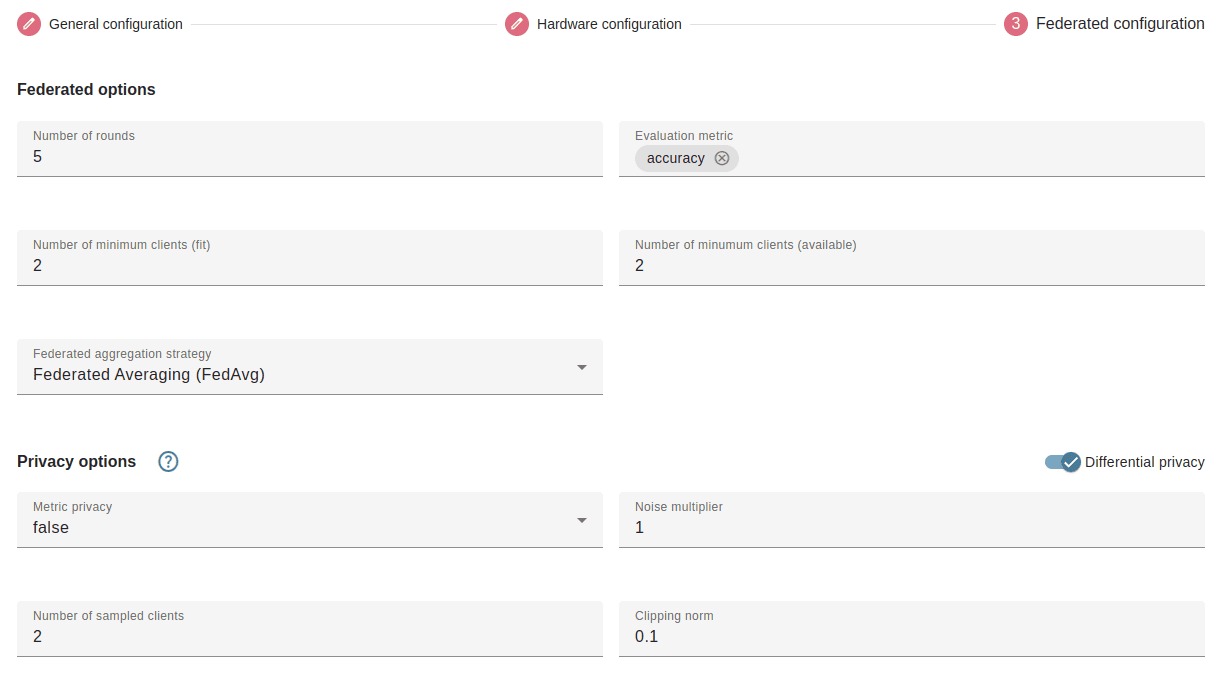
tokenswill deploy the federated server with authentication enabled between the server and the clients (more info in the next sections).The Federated configuration: The last section (
Federated configuration) will let you choose specific configuration for the FL training server like:how many rounds you will train,
the minimum number of clients,
the federated aggregation methods and the metric(s) analyzed,
etc.
Training with Federated learning
Starting the Federated Learning server
Note
This step is not needed if you configured the deployment to run with the fedserver
option.
If you deployed with JupyterLab/VScode, open the IDE and start the fedserver process:
$ cd federated-server/fedserver
$ python3 server.py
If you want to change any parameters in the federated configuration, you can
always modify fedserver/server.py.
Retrieve the configuration
Now that your fedserver is running, you need to do the following steps:
Find the endpoint where your server is deployed:
Once your FL server is running, go back to the Dashboard, find your deployment, click on
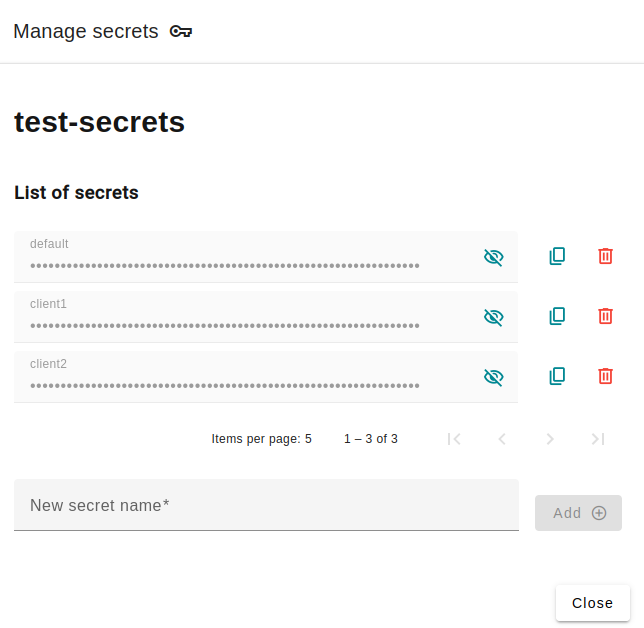
Infoand copy the URL offedserverendpoint.Find the secret token of your deployment:
Note
This step is only needed if you selected the
tokensDocker tag during configuration.The platform provides users with a token-based system that can be used for authenticating the clients prior to their incorporation into the federated training.
To access the secret token, find your deployments and click the icon. You can generate as many tokens as needed (eg. 1 token per client), as well as revoke them:
Share them with the clients:
Note
This step is only needed if you selected the
tokensDocker tag during configuration.You will need to share the endpoint and the appropriate token with the clients that will take part in the training. In the section below we will explain how the clients can use them to connect to the training.
Connecting the clients
In order to connect the clients to the FL server deployed within the platform, two approaches can be followed depending on where the clients are running:
Clients running locally on the user’s resources or on servers external to the platform. This is the most classic approach as in general in a FL training the data should not be leave the server where they are stored for training. Note that in most cases privacy restrictions are applied on them that prevent their centralization. Thus, in order to connect each client to the server, the clients must know the UUID of the deployment where the FL server is deployed as well as the datacenter on which it is running (IFCA or IISAS). Then, you can add the
call_credentialsparameter if the server has been created using tokens, as will be explained in the following section.In this line, each client can connect to the server as follows:
import certifi
# Start -> connecting with the server
uuid = "*********************"  # UUID of the deployment with the FL server (dashboard)
data_center = "****" # The value for the data center can be ifca or iisas (lowercase)
end_point = f"ide-{uuid}.{data_center}-deployments.cloud.ai4eosc.eu"
fl.client.start_client(
    server_address=f"{endpoint}:443",
    client=Client(),
    root_certificates=Path(certifi.where()).read_bytes(),
)
Clients running on different deployments of the platform. If you are running your clients from different deployments created in the platform, in order to connect to the server you have to first find the IP of the server form the server side. In this line, you first go to the deployment in which you have started the server, open a terminal an run:
env | grep NOMAD_HOST_ADDR_fedserver
This will provide the IP and the port in which the FL server is running.
Then, from the client side, you can start the client as follows (again, you can add the
call_credentialsparameter if needed), introducing the IP and port from the server side asserver_address:# Start -> connecting with the server server_host = "*********************" # FILL IN WITH THE SERVER IP AND PORT FOR FL (server side) fl.client.start_client( server_address=server_ip, client=Client() )
Client-server authentication
In the platform, we use a custom fork of the flower library to perform FL trainings.
In the code below, we provide an example on how to integrate the previously obtained token and endpoint into the client code. More examples are available here.
import flwr as fl
from pathlib import Path
import certifi
import ai4flwr.auth.bearer

# Read the data, create the model
# (...)

# Create the class Client(), example of Flower client:
class Client(fl.client.NumPyClient):
    def get_parameters(self, config):
        return model.get_weights()

    def fit(self, parameters, config):
        model.set_weights(parameters)
        model.fit(x_train, y_train, epochs=5, batch_size=16)
        return model.get_weights(), len(x_train), {}

    def evaluate(self, parameters, config):
        model.set_weights(parameters)
        loss, accuracy = model.evaluate(x_test, y_test)
        return loss, len(x_test), {"accuracy": accuracy}


token = "*********************" # INCLUDE THE TOKEN GENERATED IN THE DASHBOARD
auth_plugin = ai4flwr.auth.bearer.BearerTokenAuthPlugin(token)

# Start -> connecting with the server
endpoint = "*********************"  # FILL IN WITH THE ENDPOINT (dashboard) OR THE SERVER ADDRESS
fl.client.start_client(
    server_address=f"{endpoint}:443",
    client=Client(),
    root_certificates=Path(certifi.where()).read_bytes(),
    call_credentials=auth_plugin.call_credentials()
)
If you didn’t selected token authentication, feel free to remove the
call_credentials parameter in the start_client() function.
Server side differential privacy
DP states that an algorithm is differentially private if by viewing its result an adversary cannot know whether a particular individual’s data is included in the database used to achieve such result. This can be achieved by adding controlled noise using different mechanisms, such us Laplace, Exponential, Gaussian, etc. We can use the privacy budget for controlling the amount of noise, i.e. the level of privacy and the utility of the data.
In case that you want to start a FL server and include more privacy restrictions when building the global aggregated model, you can add differential privacy (DP) from the server side.
Specifically, you can perform this step from the FL configuration when creating the server. You will need to include the noise multiplier for the Gaussian Mechanism, the clipping norm and the number of clients sampled parameters. Note that this functionality is compatible with each of the aggregation strategies available in the platform. It’s important to note that in this case the noise multiplier is not the privacy budget, but here a greater value of the noise multiplier implies more privacy restrictions (more noise) and less utility.
This allows to ensure central DP from the server-side when building the global model with fixed clipping.
Server side metric privacy
Metric privacy (also known as metric differential privacy or d-privacy) is a variant (relaxation) of differential privacy that can be used in domains in which there is a notion of distance. Unlike standard DP, this concept takes into account the distance between the datasets involved. This can be useful in order to adapt the privacy level and noise added to offer better privacy when the distance is small.
Following the work done in this preprint, the distance metric considered depends on the distance between the model updates of the clients involved. In order to do so, the server calculates the maximum distance for each pair of clients by analyzing the local weights received from each of them. With the proposed approach given for including metric privacy in the server side in a FL training, we can guarantee metric-privacy for each round of the architecture. According to the aforementioned work, users can choose to rely on metric privacy instead of standard DP to achieve a better balance between added noise (calibrated using the distance), and protection against client inference attacks in cases where the server is trusted, but not all participants, or they simply want to prevent such attacks from the final model if published.
Note that the same parameters as for the case of server side differential privacy are used (noise multiplier for the Gaussian Mechanism, the clipping norm and the number of clients sampled).
More information in this approach can be found in this preprint.
Monitoring of training CO2 emissions
To provide users with the ability to monitor carbon emissions derived from their training, the FL server includes an integrated emissions monitoring feature. This functionality is implemented using the codecarbon Python library.
Users can enable emissions tracking when deploying the FL server. To do so, they must activate this option when deploying the server from the dashboard, and then introduce some modifications on the client side to report local training emissions. The server then aggregates the emissions reported by the participating clients in each round, along with its own emissions, primarily from the aggregation process.
Note that clients must voluntarily enable emissions tracking, the platform cannot enforce this functionality on them. The goal is to allow each client to track its own local emissions and send this data to the server, which then aggregates it with its own emissions to determine the overall training footprint. To facilitate this, only few changes are needed from the client side once the emissions tracking is allowed from the server, using codecarbon and including it the Client class (which inherits from the Flower fl.client.NumPyClient class). Note that the clients must install codecarbon locally:
import flwr as fl
from codecarbon import EmissionsTracker

# Read the data, create the model
# (...)

# Create the class Client(), example of Flower client including tracking the emissions:
class Client(fl.client.NumPyClient):
    def get_parameters(self, config):
        return model.get_weights()

    def fit(self, parameters, config):
        model.set_weights(parameters)
        tracker = EmissionsTracker()
        tracker.start()
        model.fit(x_train, y_train, epochs=3, batch_size=16)
        emissions = tracker.stop()
        print(f"Client Carbon Emissions: {emissions} kg CO2")
        return model.get_weights(), len(x_train), {"emissions": emissions}

   def evaluate(self, parameters, config):
       model.set_weights(parameters)
       loss, accuracy = model.evaluate(x_test, y_test)
       return loss, len(x_test), {"accuracy": accuracy}
The rest of the process, in which the server receives emissions from each client and aggregates them with its own, is handled on the server side once this option has been enabled. This allows the server to compute the total training emissions per round alongside the results for the aggregated metric(s) selected.